Friday, December 28, 2012

cs lewis printable

I love CS Lewis.  I find him extremely inspiring and very pragmatic about the gospel.  I was messing around today and this is what I made:


I don't know why  part of the d got cut off in the jpeg, but you can go here to download the pdf.

This quote reminds me of this talk by Elder Christofferson about our daily bread, found here.  It's a great reminder of why we need to rely on God every day.  

Missionary Stocking Tutorial

 I wanted to make Andy a cute missionary stocking for Christmas, and I found a link here where you can order a stocking pattern.  But let's face it, you already know I am lazy, and it was already November.  So I went to Hobby Lobby and found two black satin stockings.  ( I try to do doubles of everything so the comp. gets to share in the joy!)  I just used this as a base and for the "slacks" portion of the stocking.  Next, I traced the upper area of the stocking onto the back of some sticky back white felt (with the paper still on!)  I cut it out and stuck it on.  Then I sketched a collar template, don't forget to do one in reverse, and cut two of those.  Then I followed with a small pocket, which was just basically a small rectangle.  I would put my templates on here, but I know everyone will find different stockings, so just using 
your own as a pattern is the best idea, I think. 
  I also hot glued some buttons on the collar and down the shirt front.  The next detail I added was a belt.  Again, I just traced the width of the stocking and made a strip about an inch tall.  This was also cut from sticky back felt.  I stuck it on, then cut a small rectangle out of yellow felt, which I hot glued, and then topped with an even smaller rectangle of brown.  I added a little sliver of yellow to be the tongue of the belt.  Wait, is that what it's called?  Anyway, that pokey thing that goes through the belt holes.
That one.
It's just a sliver of yellow felt.  


On to the tie!  I first had my husband tie some ties for me out of wide ribbon.  But they wouldn't lay right, or stay tied, and finally, I got the genius idea of just pinching the tie where I wanted the knot to be and pleating it a little with my fingers and gluing it.  Then, I wrapped that portion with a smooth piece of ribbon, shaped it into a triangle, and glued that.  Then the whole shebang gets glued onto the stocking.  I did leave the lower part of the tie unattached, because I thought it looked cuter that way.  Do it however your heart desires!  

I found a download for the tag here.  I just inserted into a powerpoint slide and put in the names myself.  Then printed and laminated them.  I don't know how well they stayed on, I will have to ask my son, but I did try to glue them on there pretty well.  

Hope this inspires you to send some joy to your missionary!  And since Rachel wants to go as soon as Andy comes home, I am sure I will be coming up with a sister missionary stocking!

Linking this up on or so she says...

six letters

  So, when Andy left on his mission a few months ago, I thought it would be helpful to send some pre-written letters with him.  Ones that he could open and read, or re-read when he needed them.  So I wrote six letters for him to take.  I think.  I didn't actually make notes until after he left, so I am remembering as best I can.  If I didn't remember perfectly, then these are six letters that I wish I had written!  I wrote each one on a card, with a scripture or thought on the front of the card, and the body of the letter inside.  I am going to share the quotes and subjects, or ones that I think would be helpful, since I can't actually remember everything!  I wrote when he should open each letter on the outside of the envelope.  

1.  Open on First day-I wrote this on the front, "Lift up your heart and rejoice, for the hour of your mission is come; and your tongue shall be loosed, and you shall declare glad tidings of great joy unto this generation." (Doctrine and Covenants 31:3)  This was the scripture Sis. Pinegar read to us when I entered the MTC many years ago, and it struck me with such great force that I remembered it often both as a missionary, and since.  I wrote inside about how joyful we were that he was getting this amazing privilege to serve the Lord.  And how much joy he would receive from this great opportunity.

2.  Open when things are hard with your companion- Idea for the quote:  "“Do not waste time bothering whether you ‘love’ your neighbor; act as if you did. As soon as we do this we find one of the great secrets. When you are behaving as if you loved someone, you will presently come to love him.” C.S. Lewis
I shared my experiences of difficult companionships, and also my advice- to serve and pray for your companion.

3.  Open when things are good- I put this scripture on the front-"Yea, I know that I am nothing; as to my strength I am weak; therefore I will not boast of myself, but I will boast of my God, for in his strength I can do all things; yea, behold, many mighty miracles we have wrought in this land, for which we will praise his name forever."  Alma 26:12-This was the scripture I chose for my mission plaque.  I tried to always remember that I was just an instrument in the Lord's hands, working for his glory.  Inside, I wrote about humility and gratitude.

4.  Open when things are really hard-Idea for the front:  I think I put this scripture "And if men come unto me I will show unto them their weakness. I give unto men weakness that they may be humble; and my grace is sufficient for all men that humble themselves before me; for if they humble themselves before me, and have faith in me, then will I make weak things become strong unto them."  Ether 12:27.  I think I wrote about just hanging in there when things are tough, because you are never alone.  And how trials really do strengthen us in ways that we can't see or understand at the time.

5.  Open when you are doing everything right, but nothing is going right- I think I put this scripture on the front about the stripling warriors. "Yea, and they did obey and observe to perform every word of command with exactness; yea, and even according to their faith it was done unto them; and I did remember the words which they said unto me that their mothers had taught them." Alma 57:21.  I wrote about how sometimes, we have an "obedience month", as one of my companions called it.  When the Lord wants to see just how obedient you will be, even if the blessings aren't coming right away.  Actually, I think he wants US to know how obedient we can be.  Every missionary has an obedience month or two. 

6.  Open on your last day- I didn't send this letter with him, thinking that I would mail it as it gets closer.  I just hope I don't forget!  Scripture for the front: "Well done, thou good and faithful servant: thou hast been faithful over a few things, I will make thee ruler over many things: enter thou into the joy of thy lord."  Matt. 25:21
I would write about all the blessings we have received as a family, and that he has received as a missionary, and how great a privilege it is to serve the Lord with all your heart. 

I know that in this digital age, we need something tangible that we can hold and touch and read over and over.  I hope this gives you some ideas that you can use to help your missionaries!  I had the experience of serving a mission, but even if you are not an RM yourself, you have had many experiences in your life that you can draw on to give counsel and encouragement to your warriors!

P.S.  My son is brilliant.  I mean that literally.  But he JUST figured out that the cards OPEN and that there is something INSIDE!  *sigh*  So if your son/daughter is of the absent-minded variety, you might want to let them know that these are more than just quote cards!!!

Hanging Advent Tutorial


I don't even know if I would call this a tutorial, because it was so easy!  I went to Hobby Lobby and bought this driftwood frame, using my 40% coupon.  I know lots of crafty/thrifty people out there would go find a pallet and take it apart and make their own, but I am lazy.  And I don't know where to find pallets.  Or how to make a frame.  So... I just bought one.
Then I took a length of jute twine (like in the picture above, which can be found pretty much at any craft store), and wrapped and knotted it around one side of the frame.  Then I stretched it across and knotted it on the other side.  I did two "clotheslines", but if your frame is bigger or taller, you could do more.  Also, I really procrastinated so we did the 12 days of Christmas instead of a 24 day advent countdown.  

Then I added these:


Mini kraft envelopes and mini clothespins, both from canvas home basics line of scrapbooking, found at Hobby Lobby.  I just clipped the envelopes on to the twine with a clothespin.  


Then I slipped a little card with an activity on it in an envelope.  Oh!  I almost forgot!  I printed off numbers 1-12 from different fonts that I liked and cut them and glued them to the front of the envelope.  


See how cute it is!  Don't forget some baker's twine!  It makes everything cute.  Even brown paper bags.  Especially brown paper bags.  I just tucked some berry picks around each corner, and it was done!  Easy-peasy.  Seriously, the longest part was cutting out the numbers.


Here is my calendar hanging on the wall. What fabulous pix my iphone takes.  Sigh.  Maybe next year Santa will bring me a nice d-slr camera.  :)

There you have it!  If you want to see what we did, here is an example of some of  my activity cards. If you want to use my numbers, here is a file of cards 1-24.  You can just print off whichever ones you need.  I just bubble cut around each number.   You could also buy stickers, but I was too cheap to buy 12 different kinds of number stickers!  Plus, I got to create my own.  Enjoy!

Saturday, November 10, 2012

Greenie package

So I sent my first package to Uruguay. I have no clue when it will actually get there, but we wanted to send some love to our greenie. I went to the store and looked for anything green, reasonably small, and not too perishable. This is what we came up with:


Sour skittles.  Yum.
Elder Pyper LOVES jalapeno chips.  I wonder if they will be smithereens by the time they get there.
No one in our family can get enough of pez dispensers.  And who can resist ferb.  We love phineas and ferb.
A variety of green things-jello, mike and ikes, ring pops, gum
Green pumpkin flashlights!  And beef jerky.
Here is the whole caboodle.  I tried to send two of most things, one for Andy and his companion.
And to top it off, green packing tape!

I will update when I find out what condition this package arrived in .  Stay tuned for more ideas
!

Saturday, October 20, 2012

My big project-the big 4-0 in a box!

Not my big 4-0, of course.  Mine happened a few years ago!  But it was my only sister's big milestone birthday and I wanted to make it extra special.  She lives about 600 miles away-the closest we have been in decades.  We are both military wives and would love to live next door to each other, but it just doesn't work that way!  So I started brainstorming a little while ago.  Should I throw her a party in a funeral home?  Fly her somewhere?  Hire a stripper?  Ok, none of those was going to be feasible, so I did what I do best--shop!  and create!  (well, in my case, copy other people's fabulous ideas) and worry about every little detail on every little project!  Because she is the one person in the world who will appreciate the time and love I put into every last millimeter of her gift!  So I decided to send her a box full of 40 presents. 
                                                   See?
I wrapped the whole thing in more kraft paper and
topped it off with 40 candles.

I found this idea on you are my fave (which is now one of my faves!)


Anyway, I spent an inordinate, but completely enjoyable, amount of time figuring out what forty things I would send her.  I decided to send several categories:  party in a box, my favorite things, crafty stuff, handmade with love, forty and punny, and miscellaneous for anything else!  Here is a list of some of the things I put in:

Favorite things:
truffles (lindt)
Bath and Body works candle, slipper socks, lip gloss

Party in a box:
Confetti (made with a 1" punch and tissue paper)
Balloon wreath (see this post)
Mini pinata (see this post)
40 candles
party horns

Handmade:
A halloween hanging
a mini clipboard covered with scrapbook paper
a twine covered letter (future craft in the car tutorial)

Forty and Punny:
Forty rocks-pop rocks
Forty blows-bubble gum
Forty sucks-40 dumdums in a box
You are flippin' 40- a nice cookie spatula
Whoopie you are 40-a whoopie pie pan


The best part was wrapping!  I love to wrap presents.  I love to wrap coordinating, cute presents.  I love spending many minutes finding just the right detail to embellish my treats!  I used kraft paper and black, cream and red as my palette.  Here are some examples.  

Brown kraft takeout box from thinkgarnish.com, canvas flower from canvas home basics.


Brown burlap bag also from thinkgarnish.com.  Canvas banner from canvas home basics, a crafty scrapbooking brand I  adore.

More canvas home basics, plus super cute ribbon and flowers from my local scrapbook store.  I think the flowers are Prima.


This is one of my faves.  I threaded twine through the grommets on the banner flags.  So cute. 


I mad a fabric flower out of the ribbon from above.  Put it on a giant gluber.


Side view of the above present.  Ripple cup from thinkgarnish.  Love that website!


And now some real pix from a real photographer!  T sent me these after she opened the box. 


There you go.  My labor of love.  And time.  And much kraft paper and twine.  Special thanks to my hubby who dealt with all this stuff in our bedroom for about 10 days, while I wrapped in my spare time!  Anyone need me to wrap anything?  I am available until December 24! 

Friday, October 19, 2012

Another craft in the car!


I am back with another fun craft in the car!  I was still working on my huge project, so I needed every spare minute of crafting I could squeeze in.  This project:  a mini pinata!  Here is what you need:

Tissue paper.


Twine-doesn't matter what color. 
 It will be hidden.


Cardstock


Super tacky glue, scissors.


something to fill the pinata with


This cone pattern,  you can get it here
Cut two cones, one of each color of cardstock.
Fold the tab.

Roll the cardstock into cone shape,
 gluing along the tab.

Repeat, so that you have two cones.


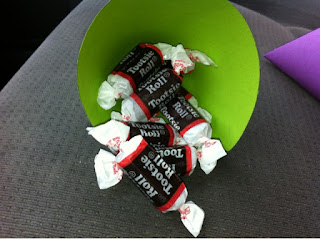
Fill the cone with your choice of candy.


Glue the cones together.  This step is messy and awkward, unless
your cones are perfect.  Mine weren't, so I just held it together until
the glue set, about 2-3 minutes.

Cut a strip of tissue paper, about 2 inches wide and long enough to wrap around the middle of the pinata.
Fold in half lengthwise.  Dot some glue every couple of centimeters along the fold.  Cut a piece of twine
about 4 inches longer than the tissue paper.  Place in the crease, and fold over the tissue.  

It should look like this.


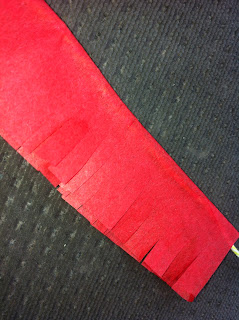
Take the scissors, and cut from the outside edge of the tissue
about 3/4 of the way to the fold, creating a fringe.
Repeat with another color of tissue.  Glue them around the
pinata to hide the seam.  


Ta da!  A super cute, mini pinata!  
Just don't use a big stick to hit it!  Maybe a spoon?


Tuesday, September 25, 2012

Crafts in the Car

So if you are anything like me, you spend a lot of time in the car. A lot of that time is spent waiting. And waiting. And waiting. I usually read or check email or make phone calls---okay, actually I spend a lot of that time on Pinterest! Anyway, I thought I would see if I could get a little crafting done!

My first project: a balloon wreath! This is part of a much bigger project I am working on- check back later! I have seen several versions of this on the Internet. This is how I made mine.
First, take a straw wreath. Do not remove the plastic! Next, you need about 150-200 12" balloons. Also, a couple of packs of greening or floral pins. They are u-shaped wires.

this is a closeup of the pins


Take a balloon and a greening pin. Place the balloon on the wreath and push a pin into the wreath to keep it in place. The pin shouldn't go through the plastic of the balloon, but the wires should go on either side of the balloon.
If you look closely, you can see the wire around the balloons.  You can do them two at a time, if you want.  I actually only did a few that way, and then switched to just one balloon per pin, because I wanted the flexibility of placing each balloon at a different angle.  Place the balloons every which way until it gets nice and full!  


It is starting look like a wreath!  See, I told you I was in my car!


Here is the finished product!  It really only took me about an hour!  I added some curly ribbon and a bow to finish it off! It would be fun to make this in colors to match your house, or your party decor.  
This was so much fun, I just might keep doing crafts in the car!