Monday, February 9, 2015

Valentine Hugs

Here is a quick review of this past week's class:
First, I shared one of our fave treats-Pretzel Hugs!  There are only three ingredients:
M&Ms

Square pretzels-the only brand I have found so far is Snyder's of Hanover Snaps.


and Hershey's Hugs.


 Put all the pretzels on a cookie sheet or pan that has been lined with parchment or aluminum foil.
Then put an unwrapped Hug in the center of each pretzel.  Put into the oven at 200 degrees F. for about 5 minutes, or until the Hug is soft enough to push flat.
 

Put an M&M in the center of each Hug, pressing the melted Hug flat as you do so.  Let them cool, or if you are impatient like me, and it's winter, put them outside for a few minutes.


That is it!  Three ingredient crack.  Seriously, these are very addicting.  You can't eat just one.  Or twenty.  The worst part of this recipe is unwrapping all the Hugs.  And waiting for them to cool.  And this is a treat you can do every season because the M&M colors change!  Also, it is good with Rolos in the middle instead of Hugs.


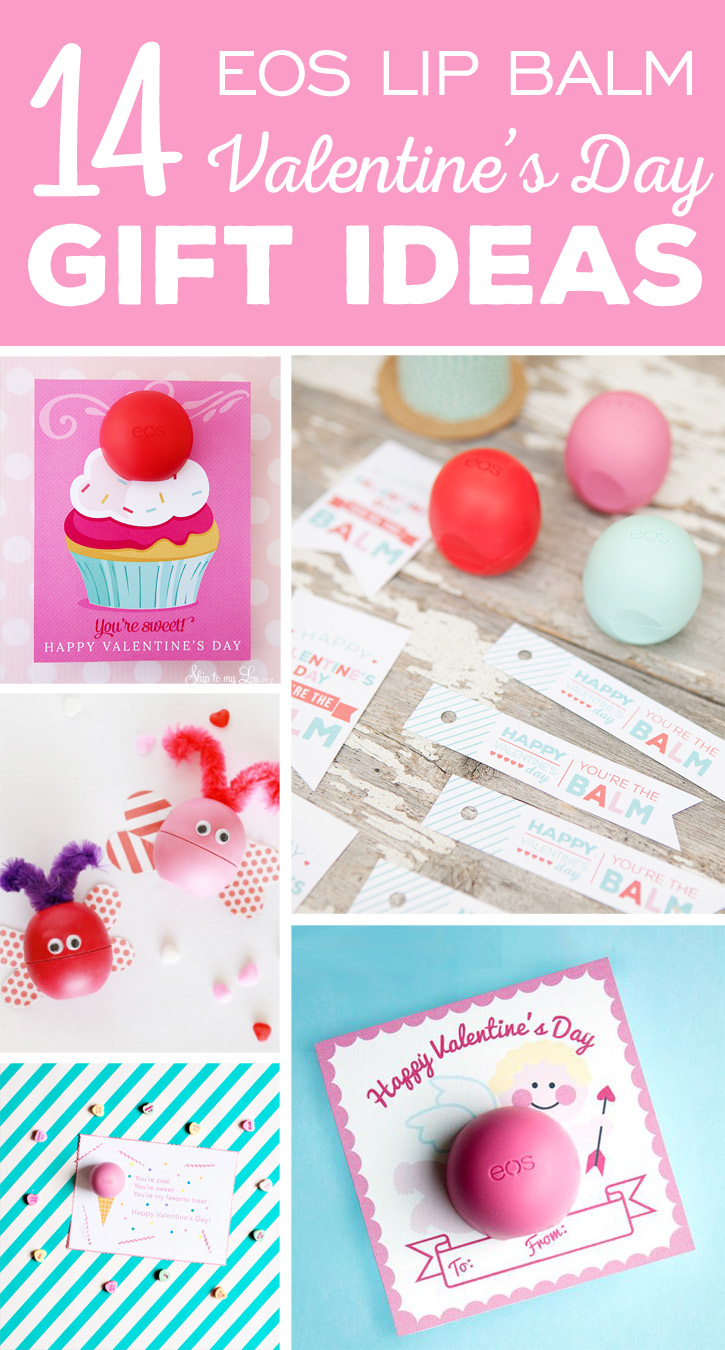
We also made some super easy valentine projects:


This picture is from everydaysavvy.com and includes a tutorial if you need to review.  Also, she has a free template printable on there for the wrapper.  The only thing I did different was make the edges straight and tape them instead of cutting a slit and making a tab.  You can find the post HERE

You can go HERE, to one of my favorite blogs, simpleasthatblog.com, for a roundup of creative Valentine's using an EOS lip balm.  


And I found a great roundup of free printables and cute ideas HERE on positivelysplendid.com.  Enjoy!


Saturday, December 13, 2014

A Few Christmas Goodies

I love candles.  I LOVE these brilliantly creative ideas from the 36th avenue for gifting them.  So easy and adorable!  You can find the tutorial to these cuties HERE

My kids are getting to the age where they are starting to want money instead of presents.  But handing over an envelope isn't very fun.  This super cute idea is from makingmemorieswithyourkids. You can find this tutorial HERE.

You know I am a sucker for anything in a jar.  This is a great keep warm kit in a jar.  This is from 30 days and you can find the tutorial HERE.

I couldn't resist a few more creative money ideas.  These are from top inspired.  You can find them HERE.

And if you are starting to run behind on your holiday gifting, hold off until after Christmas, and deliver some New Year's cheer!  This is an adorable, and very doable gift.  With a free printable!  This one is from create craft love and you can get it HERE.

So, back to the holiday magic!  Hope you all have a wonderful and joyful Christmas season!  And remember in all your gifting, the real reason we do all this-this is a great little video; check it out if you have a minute.

Saturday, November 22, 2014

Christmas Gifts


This last class I taught at the scrapbook store, we focused on fun and quick gifts for Christmas.  So here is a quick recap! 
Above, is a little kit with sugar cookie mix, hot chocolate mix, sprinkles in little containers, and dried marshmallow bits in an ornament.  I also added some chocolate dipped spoons.  You can see the original idea on pinterest here.

Next is a fun item you can pop in the mail for not very much.  Cotton candy, dressed up!

I just got a container of cotton candy in the christmas aisle at walmart.  It only weighs a few ounces, so you can mail it as a first class parcel for just a couple of dollars.  I wrapped it around with some kraft paper and a cute scrapbook piece, and it's ready to go.  

Here, on triedandtrue, I found one of the cutest ideas ever!
It is an EOS lip balm as a rudolph nose!  You can go to her site for the free printable.  Also, one of the ladies in my class found the Walgreens brand of lip balm in the same shape, but it is shiny!  Like Rudolph's nose.  So cute.

Another quick project we did was originally found HERE, on damasklove.  A great way to jazz up a kraft bag.
We also made these
which can be found HERE on bubblynaturecreations.  I used the dip mix recipes from this blog budget101.  We used the onion dip, fiesta dip, and copycat hidden valley ranch, but there are several others to choose from.  

I also showed the ladies one of my fave gifts, hot chocolate on a stick! 
The original post on this cute project is HERE.  This amazing idea is from giverslog, whose author AmberLee owns this shop HERE.So if you don't feel like DIYing it, she has some great gifts that will make any chocolate lover happy.

One last idea, was a gift card snow globe.  

HERE is the original post from smartyhadaparty.

I'm going to be making a few of these!  If you have specific questions about any of these projects, just leave me a comment!

Wednesday, September 24, 2014

Jar-a-holics Anonymous

Last night I got to share some cute ideas with a super fun bunch of ladies, all having to do with jars!  It was fun to talk about my one of my obsessions with some fellow crafters. So, here is a quick takeaway from the night.  You can bake and freeze these little gems!  They are very sturdy and made for high temps, so bake away!  They can also go from freezer to oven. If you premake a pie or some other concoction and then freeze instead of bake it, you can just pull out the number of jars you need, put them on a baking sheet, and bake those goodies. If you are worried about cracking, put them in the cold oven and turn it on to preheat. I don't know that it really makes a difference, but it might make you feel better!  :)
So far, I have just been able to take any regular recipe and portion it into the jars and bake as usual. The only thing that might change is the length of cooking time, which might vary depending on what size jar you use, so keep a closer eye than usual until you have had a trial run of your recipe. Here is one of my faves, the cheesecake we had last night. It's one I combined from several different recipes and tinkered with until I was happy. 

Cheesecake in a Jar

2 cups cookie crumbs (I use Biscoff, available on amazon.com)
1/4 c brown sugar
1stick butter, melted

4 8 oz packages cream cheese, softened
1 1/2 c sugar
4 eggs, room temp
1 c sour cream
1 T vanilla 
Zest of 2 lemons
Juice of 2 lemons

Preheat oven to 350 F

Mix first 3 ingredients-place 1 T in each of 24 jelly jars ( the 4 oz kind) and pat down.  

In large bowl mix cream cheese and sugar until well blended. Add eggs, one at a time. Add lemon zest, juice, sour cream, and vanilla, and mix until blended. 

Using a large scoop, fill each jelly jar with about 1/3 cup filling, or up to bottom line. Place jars in large roasting pan or two cake pans and add hot water halfway up the outside of the jars. Bake for about 30 minutes. 


I found this recipe HERE on idearoom.net.  But I  tweaked it a little.  So you can go with the original one in the post, or my version, which is a little spicier.

Tami's Pumpkin Sugar Scrub

  • 2 cups Brown Sugar
  • 1/2 cup White Sugar (or Raw Sugar)
  • 2 teaspoon Cinnamon
  • 2 teaspoon Pumpkin Pie Spice
  • 1 teaspoon Nutmeg
  • 1 teaspoon Ginger
  • 1/3 cup Coconut Oil
Mix ingredients well in medium bowl.  If a little dry, add coconut oil until desired consistency.  Put in airtight container.  This should keep in the refrigerator for a couple of months.


Another fun thing to put in a jar, this yummy snack-pumpkin payday mix!  Take a bag of candy corn, a bag of indian corn, a bag of pumpkins, and a jar of honey roasted peanuts and mix them all together.  It tastes like a Payday!  Seriously.  And it looks super cute in a jar.  But what doesn't, really?

Enjoy!

Tuesday, August 19, 2014

Fruit salsa and cinnamon chips

This is a super yummy fresh treat!  
Fruit Salsa with Cinnamon Chips

Salsa:
2 kiwis, peeled and diced
2 Golden Delicious apples - peeled, cored
and diced
8 ounces raspberries
1 pound strawberries
2 tablespoons white sugar
1 tablespoon brown sugar
3 tablespoons raspberry preserves, seedless

Chips:
10 (10 inch) flour tortillas
butter flavored cooking spray OR melted butter
1/2 cup cinnamon sugar
DIRECTIONS:
1.In a large bowl, thoroughly mix kiwis, Golden Delicious apples, raspberries, strawberries, white sugar, brown sugar and fruit preserves. Cover and chill in the refrigerator.

If you prefer not to make your own chips, you can use Stacy's Cinnamon Pita chips. They're delicious and will save you some time. 
2.Preheat oven to 350 degrees F.
3.Coat one side of each flour tortilla with melted butter or butter cooking spray.  Cut into wedges and arrange in a single layer on a large baking sheet. Sprinkle wedges with desired amount of cinnamon sugar. Spray again with cooking spray or lightly brush with butter.
4.Bake in the preheated oven 8 to 10 minutes. Repeat with any remaining tortilla wedges. Allow to cool approximately 15 minutes. Serve with chilled salsa. 
  (Adapted from allrecipes.com)


Tips:  I use the store bought pita chips unless I have extra time to make the cinnamon chips. Also, feel free to substitute the fruit called for with those you prefer. This is also great with nectarines, peaches, blackberries, blueberries...

Monday, August 18, 2014

Cake pops and stuff

Here's a quick review of class at TCC last week!  We made these cute little guys:


 Here are some cake pop basics:  

Best website: bakerella.com.  Not only is her site really informative, she has the best eye candy!  

Basic recipe:

1 cake mix, baked to instructions
1 can frosting
2 bags candy melts
lollipop sticks

Crumble cake with hands into large bowl.  Don't worry about crust pieces that don't crumble as easily.  They will soften when the frosting is added.  Add about 1/2 can of frosting.  Mix well.  If the mixture doesn't roll into a ball easily, add a little more frosting.  Use a mini scoop to scoop your cake mixture.  Roll in ball with your hands.  Chill the cake balls for about an hour, until firm.  When ready to dip the cake pops, melt the candy melts in a plastic bowl.  Usually, this works best if you microwave at 50 percent power for 1 minute at a time, and then stir.  Repeat until the melts are a nice consistency for dipping.  If needed, add a little shortening to make it thinner, or coat more easily.  Dip a lollipop stick into the candy mixture, just about 1/2".  Then insert the stick into a cake ball. Allow to harden for a few seconds.  Dip the cake ball, straight down and up out of the mixture.  Gently tap the wrist that is holding the cake pop with your other hand to remove excess coating.  Then, either put the cake pop on wax paper, upright, or insert into styrofoam block to cool.  Decorate as desired. 

Helpful hints:
Don't use cake mix with pudding in the mix.
Don't add too much frosting to begin with, you can always add more if you need, but if the mixture is too mushy, your cake pops will be hard to work with.
Coat twice if you want your pops to look nice and round and smooth.
Use toothpicks to apply extra coating, to "glue" on your candy, and to clean up edges.
After dipping for a little while, your melts will have some moisture in them, and also might be getting a little hard.  Zap them in the microwave with a little shortening to get the consistency right.
And last, presentation is everything!  Put them in a cute container!


Here are a couple more ideas from class:

Happy Mail!
 Start with a soda bottle, clean, dry and cut in half with a serrated knife and scissors.
 Gather some cute, lightweight items for the inside.
 Fill up both halves.  Put the bottle back together with packing tape.
 Then decorate.
Add a cute piece of card stock for a mailing label.  Address and put stamps on it.  You can check the USPS first class parcel rates HERE.  Throw it into the blue mailbox!  Enjoy your day, knowing you just made someone happy!

Wednesday, August 6, 2014

Homemade Microwave Popcorn

Guess what I learned last week.  You can make your own microwave popcorn.  Seriously.  After intensive research, I found that the best results were had from the combo of 1 1/2 Tablespoons of Orville Redenbacher popcorn kernels and a kraft treat bag, about 6"x9".  That's it.  Just put the popcorn in the bag, fold the top over about 1/2", 2 or three times and secure with washi tape or a staple.  Pop for 1 and 1/2 minutes.  (That was the magic time in our microwave.  You might have to adjust for your own microwave's idiosyncrasies.)  Your bag is just the right size for an individual snack, or you can share if you are both feeling really generous.  Or not very hungry.  We sprinkled melted butter and salt on ours.  Yum.  Here's a printable label to add to your bag if you want to give it away.  
popcorn label link