Showing posts with label birthday. Show all posts

Tuesday, April 8, 2014

Teddy bear birthday

I
So it's just been like 18 months since this party, but I am finally uploading pix to the computer and trying to declutter my to-do list. Bekah decided to have a teddy bear party, and she wanted purple and teal for her colors.  So we went on a bear hunt-on Pinterest. Because there are a billion cute ideas involving teddy bears!
  
One of the best things about this party was the low cost decor. I learned how to make these awesome tissue flowers and we used them as a main ingredient.  Add in some balloons, with a marble inside so they will hang upside down, twist up some streamers, and you have a lot of bang for your buck!
We put some on the front door, too.

These basic cupcakes are super cute with printables from chickabug.com. 
I actually took the cupcake wrapper (from chickabug) and cut it to fit the front of my plain blue treat bags. A little ribbon, and you have a custom treat bag worthy of any little girl's birthday wishes!
These are teddy bear Oreo pops. Just a double stuf Oreo dipped in candy coating, then mini Oreo for the ears, more googly eyes, a red mike n Ike, and another mini Oreo mouth. 
 I attempted some bear cupcakes-I think these are just mini kisses, Wilton googly eyes, and then an upside down cocoa candy melt with a little frosting mouth and red hot nose.  
I used another tissue pom, this one mini, to dress up my cake plate. I attached some ribbon with glue dots, and it held up well and then came right off when we were done!  I also love using tissue paper to make jumbo confetti.
 
We did two simple activities-one was making headbands with teddy bear ears.( I have no idea what happened to that picture. Or pix of the birthday girl, for that matter!  Probably still in the digital clutter all around me...) But the other activity was making these cute teddy bear cars.  A mini snickers bar, m&ms and teddy grahams, all glued on with candy coating.  We also tried to have other bear-friendly foods: bit-o-honeys, more teddy grahams, nilla wafers and root "bear"!  
A "beary" good time was had by all!  (Sorry, I couldn't resist that one.)

Saturday, October 20, 2012

My big project-the big 4-0 in a box!

Not my big 4-0, of course.  Mine happened a few years ago!  But it was my only sister's big milestone birthday and I wanted to make it extra special.  She lives about 600 miles away-the closest we have been in decades.  We are both military wives and would love to live next door to each other, but it just doesn't work that way!  So I started brainstorming a little while ago.  Should I throw her a party in a funeral home?  Fly her somewhere?  Hire a stripper?  Ok, none of those was going to be feasible, so I did what I do best--shop!  and create!  (well, in my case, copy other people's fabulous ideas) and worry about every little detail on every little project!  Because she is the one person in the world who will appreciate the time and love I put into every last millimeter of her gift!  So I decided to send her a box full of 40 presents. 
                                                   See?
I wrapped the whole thing in more kraft paper and
topped it off with 40 candles.

I found this idea on you are my fave (which is now one of my faves!)


Anyway, I spent an inordinate, but completely enjoyable, amount of time figuring out what forty things I would send her.  I decided to send several categories:  party in a box, my favorite things, crafty stuff, handmade with love, forty and punny, and miscellaneous for anything else!  Here is a list of some of the things I put in:

Favorite things:
truffles (lindt)
Bath and Body works candle, slipper socks, lip gloss

Party in a box:
Confetti (made with a 1" punch and tissue paper)
Balloon wreath (see this post)
Mini pinata (see this post)
40 candles
party horns

Handmade:
A halloween hanging
a mini clipboard covered with scrapbook paper
a twine covered letter (future craft in the car tutorial)

Forty and Punny:
Forty rocks-pop rocks
Forty blows-bubble gum
Forty sucks-40 dumdums in a box
You are flippin' 40- a nice cookie spatula
Whoopie you are 40-a whoopie pie pan


The best part was wrapping!  I love to wrap presents.  I love to wrap coordinating, cute presents.  I love spending many minutes finding just the right detail to embellish my treats!  I used kraft paper and black, cream and red as my palette.  Here are some examples.  

Brown kraft takeout box from thinkgarnish.com, canvas flower from canvas home basics.


Brown burlap bag also from thinkgarnish.com.  Canvas banner from canvas home basics, a crafty scrapbooking brand I  adore.

More canvas home basics, plus super cute ribbon and flowers from my local scrapbook store.  I think the flowers are Prima.


This is one of my faves.  I threaded twine through the grommets on the banner flags.  So cute. 


I mad a fabric flower out of the ribbon from above.  Put it on a giant gluber.


Side view of the above present.  Ripple cup from thinkgarnish.  Love that website!


And now some real pix from a real photographer!  T sent me these after she opened the box. 


There you go.  My labor of love.  And time.  And much kraft paper and twine.  Special thanks to my hubby who dealt with all this stuff in our bedroom for about 10 days, while I wrapped in my spare time!  Anyone need me to wrap anything?  I am available until December 24! 

Friday, October 19, 2012

Another craft in the car!


I am back with another fun craft in the car!  I was still working on my huge project, so I needed every spare minute of crafting I could squeeze in.  This project:  a mini pinata!  Here is what you need:

Tissue paper.


Twine-doesn't matter what color. 
 It will be hidden.


Cardstock


Super tacky glue, scissors.


something to fill the pinata with


This cone pattern,  you can get it here
Cut two cones, one of each color of cardstock.
Fold the tab.

Roll the cardstock into cone shape,
 gluing along the tab.

Repeat, so that you have two cones.


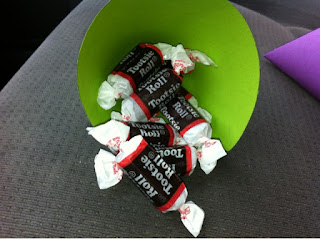
Fill the cone with your choice of candy.


Glue the cones together.  This step is messy and awkward, unless
your cones are perfect.  Mine weren't, so I just held it together until
the glue set, about 2-3 minutes.

Cut a strip of tissue paper, about 2 inches wide and long enough to wrap around the middle of the pinata.
Fold in half lengthwise.  Dot some glue every couple of centimeters along the fold.  Cut a piece of twine
about 4 inches longer than the tissue paper.  Place in the crease, and fold over the tissue.  

It should look like this.


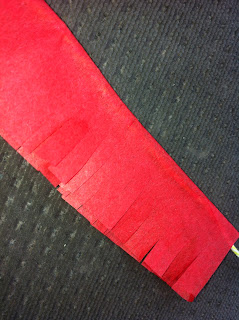
Take the scissors, and cut from the outside edge of the tissue
about 3/4 of the way to the fold, creating a fringe.
Repeat with another color of tissue.  Glue them around the
pinata to hide the seam.  


Ta da!  A super cute, mini pinata!  
Just don't use a big stick to hit it!  Maybe a spoon?


Tuesday, September 25, 2012

Crafts in the Car

So if you are anything like me, you spend a lot of time in the car. A lot of that time is spent waiting. And waiting. And waiting. I usually read or check email or make phone calls---okay, actually I spend a lot of that time on Pinterest! Anyway, I thought I would see if I could get a little crafting done!

My first project: a balloon wreath! This is part of a much bigger project I am working on- check back later! I have seen several versions of this on the Internet. This is how I made mine.
First, take a straw wreath. Do not remove the plastic! Next, you need about 150-200 12" balloons. Also, a couple of packs of greening or floral pins. They are u-shaped wires.

this is a closeup of the pins


Take a balloon and a greening pin. Place the balloon on the wreath and push a pin into the wreath to keep it in place. The pin shouldn't go through the plastic of the balloon, but the wires should go on either side of the balloon.
If you look closely, you can see the wire around the balloons.  You can do them two at a time, if you want.  I actually only did a few that way, and then switched to just one balloon per pin, because I wanted the flexibility of placing each balloon at a different angle.  Place the balloons every which way until it gets nice and full!  


It is starting look like a wreath!  See, I told you I was in my car!


Here is the finished product!  It really only took me about an hour!  I added some curly ribbon and a bow to finish it off! It would be fun to make this in colors to match your house, or your party decor.  
This was so much fun, I just might keep doing crafts in the car!

Friday, September 21, 2012

Ellie's Mustache Bash!


So the other day I gave a sneak peek of Ellie's birthday party  with this invitation.
party pix
Here are some pix from the mustache bash!  I found lots of ideas for baby boy showers and little boy parties, but nothing for a little girls mustache party!  Go figure!  Anyway, I put on my thinking cap and this is what I came up with.  We picked one color to go with black and white, and she loved the lime green.  I found some great houndstooth ribbon and some lime and white striped ribbon and we went to town!

I had only my iphone to take pix with, so they aren't the greatest, but at least you can get the idea!
 Clear glass votives with ribbon glued around the bottom.  Added a mustache for flair!


Not only were these mustaches on a stick a cute centerpiece, but they were a hit with the girls.  We spent about 45 minutes taking mustache pix! You can get the template for these mustaches from easy makes me happy.  I used sticky back felt and cut two of each, then stuck the dowel in the middle.


Even daddy got in on the action!  Here he is with the birthday girl.  Doesn't he look like Mario?


The girls also wanted to do some mug shot style pix.  This is the rear shot!  :)


Our food table.  I tried super hard to come up with lots of puns!  Or mustache-y names!  We had Black Tie cupcakes, Puttin-on-the-Ritz crackers with  dip, Walking sticks (pretzels) with 24 K dip (cheese dip), Rainbow suspenders (extreme sour strips), and Mr. Goodbars (peanut butter bars).  I also set out some candy for the movie in little buckets-tuxedo buttons (jr. mints) and mother-of-pearls (green sixlets), plus chocolate and cherry twizzlers.  I had no creativity by this point, so they just got labeled twizzlers.  :)


For decor I used black and green and white.  Mostly tissue poms and streamers.  My pix didn't turn out, so use your imagination!  But I did put these mustache posters all over the mantel.

  You can get these mustache posters here!


We played stick the mustache on the man for a game.  It was so easy- I drew a face on my dry erase board.  The girls pulled down a hat over their eyes and stuck on their mustache.  They kept playing this through the night.  Simple is best!


It was a great night! We sent the girls home with these favors made out of clear candy tubes, filled with sixlets and decorated with ribbon, mustache sticker, twine and tag.


The favor bags were just simple green bags with a mustache sticker on them.  We also put in a chocolate mustache, a wax mustache and tootsie rolls!

I have to say this was my favorite design element.  I just took a clear cup, put on a mustache sticker, made a bow tie out of ribbon, and topped it off with a green stripey straw!  The best part-each mustache/tie combo was different so the girls were able to keep track of their drinks through the night.  Thanks for coming to see our 'stache bash!