Showing posts with label missionary package ideas. Show all posts

Monday, August 18, 2014

Cake pops and stuff

Here's a quick review of class at TCC last week!  We made these cute little guys:


 Here are some cake pop basics:  

Best website: bakerella.com.  Not only is her site really informative, she has the best eye candy!  

Basic recipe:

1 cake mix, baked to instructions
1 can frosting
2 bags candy melts
lollipop sticks

Crumble cake with hands into large bowl.  Don't worry about crust pieces that don't crumble as easily.  They will soften when the frosting is added.  Add about 1/2 can of frosting.  Mix well.  If the mixture doesn't roll into a ball easily, add a little more frosting.  Use a mini scoop to scoop your cake mixture.  Roll in ball with your hands.  Chill the cake balls for about an hour, until firm.  When ready to dip the cake pops, melt the candy melts in a plastic bowl.  Usually, this works best if you microwave at 50 percent power for 1 minute at a time, and then stir.  Repeat until the melts are a nice consistency for dipping.  If needed, add a little shortening to make it thinner, or coat more easily.  Dip a lollipop stick into the candy mixture, just about 1/2".  Then insert the stick into a cake ball. Allow to harden for a few seconds.  Dip the cake ball, straight down and up out of the mixture.  Gently tap the wrist that is holding the cake pop with your other hand to remove excess coating.  Then, either put the cake pop on wax paper, upright, or insert into styrofoam block to cool.  Decorate as desired. 

Helpful hints:
Don't use cake mix with pudding in the mix.
Don't add too much frosting to begin with, you can always add more if you need, but if the mixture is too mushy, your cake pops will be hard to work with.
Coat twice if you want your pops to look nice and round and smooth.
Use toothpicks to apply extra coating, to "glue" on your candy, and to clean up edges.
After dipping for a little while, your melts will have some moisture in them, and also might be getting a little hard.  Zap them in the microwave with a little shortening to get the consistency right.
And last, presentation is everything!  Put them in a cute container!


Here are a couple more ideas from class:

Happy Mail!
 Start with a soda bottle, clean, dry and cut in half with a serrated knife and scissors.
 Gather some cute, lightweight items for the inside.
 Fill up both halves.  Put the bottle back together with packing tape.
 Then decorate.
Add a cute piece of card stock for a mailing label.  Address and put stamps on it.  You can check the USPS first class parcel rates HERE.  Throw it into the blue mailbox!  Enjoy your day, knowing you just made someone happy!

Sunday, April 6, 2014


So I took a HUGE blogging break. I have no idea what happened...just crazy busy!  I thought I would catch up by posting some of the fun packages I sent Andy this past year.  Maybe I'll get them done before he comes home!  

This is one idea I had seen in several different places on the web.  I loved the idea of sending him a box of sunshine, and I think I sent it as they were heading into winter on that side of the planet. 

I bought everything I could find that was yellow, edible, non-perishable, and possibly useful to a missionary.  This is what I came up with:  

and this:

this:

this:

and this:

Because the only thing better than cereal, is cereal in a little box. That cost 95.00 to ship. That makes it extra yummy. :) 

I just threw it all in a box, blew up some balloons as padding, and topped it with this cute sign! 


I think I got this as a freebie from some super creative gal.  I can't find the exact link, but here from funky polka dot giraffe are some other super cute printables.  And you can use these this one from crafty teacher lady. I know that boys don't really care about this stuff, but I like to put a little extra effort into my care packages.  I think it's my way of trying to send my love, support, worries, and prayers without words. Because I think cereal and peanut butter help remind missionaries of a home where there are hundreds of prayers being said for them everyday.   Plus, someone has to keep the post office in business, right?

Tuesday, January 29, 2013

How to Give a Missionary a Heart Attack

Not a real one of course.  That would be crazy!  But I am always trying to think of ways to brighten our missionary's day, and since Valentine's Day is coming up, we sent him a heart attack!  Even though I am pretty sure they don't celebrate Valentine's Day in Uruguay.  It's a great excuse for chocolate.  Right?
 Step one is to cut out a bunch of paper hearts.  Any size, any shape.  I advise having your three daughters do this.  If you don't have three daughters, look around.  Someone does.  You can borrow mine.  Then, write some sweet nothings on your hearts.  Or sweet somethings.  I think we wrote things we love about Andy, and also Valentine's wishes.  I use the term "we" loosely, because I was so busy getting everything together, that I didn't write on one. single. heart.  *sigh*  What kind of missionary mom am I?  Anyway, he still got lots of love from the girls and dad, and schlepping the package to the post office and filling out the customs form should get me some props, right?
Step two.  Throw in a whole bunch of candy.  We did hugs, kisses, and peanut butter hearts.  I would do whatever your missionary/recipient likes.  Sprinkle liberally over the hearts. 
Step three.  Since we are sending this to a boy, I always try to include some kind of toy that can be thrown, flipped, or bounced.  For some reasons, missionaries never get tired of those kinds of things.  Jumping frogs are perfect.  Plus, I figure he can always give them away to little Uruguayan kids.  

That's it!  Super simple and guaranteed to make someone's day!  And way more fun than a real heart attack.  Also, a lot less serious.  

Friday, December 28, 2012

Missionary Stocking Tutorial

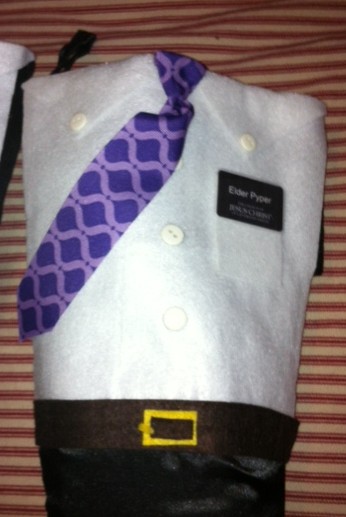
 I wanted to make Andy a cute missionary stocking for Christmas, and I found a link here where you can order a stocking pattern.  But let's face it, you already know I am lazy, and it was already November.  So I went to Hobby Lobby and found two black satin stockings.  ( I try to do doubles of everything so the comp. gets to share in the joy!)  I just used this as a base and for the "slacks" portion of the stocking.  Next, I traced the upper area of the stocking onto the back of some sticky back white felt (with the paper still on!)  I cut it out and stuck it on.  Then I sketched a collar template, don't forget to do one in reverse, and cut two of those.  Then I followed with a small pocket, which was just basically a small rectangle.  I would put my templates on here, but I know everyone will find different stockings, so just using 
your own as a pattern is the best idea, I think. 
  I also hot glued some buttons on the collar and down the shirt front.  The next detail I added was a belt.  Again, I just traced the width of the stocking and made a strip about an inch tall.  This was also cut from sticky back felt.  I stuck it on, then cut a small rectangle out of yellow felt, which I hot glued, and then topped with an even smaller rectangle of brown.  I added a little sliver of yellow to be the tongue of the belt.  Wait, is that what it's called?  Anyway, that pokey thing that goes through the belt holes.
That one.
It's just a sliver of yellow felt.  


On to the tie!  I first had my husband tie some ties for me out of wide ribbon.  But they wouldn't lay right, or stay tied, and finally, I got the genius idea of just pinching the tie where I wanted the knot to be and pleating it a little with my fingers and gluing it.  Then, I wrapped that portion with a smooth piece of ribbon, shaped it into a triangle, and glued that.  Then the whole shebang gets glued onto the stocking.  I did leave the lower part of the tie unattached, because I thought it looked cuter that way.  Do it however your heart desires!  

I found a download for the tag here.  I just inserted into a powerpoint slide and put in the names myself.  Then printed and laminated them.  I don't know how well they stayed on, I will have to ask my son, but I did try to glue them on there pretty well.  

Hope this inspires you to send some joy to your missionary!  And since Rachel wants to go as soon as Andy comes home, I am sure I will be coming up with a sister missionary stocking!

Linking this up on or so she says...

six letters

  So, when Andy left on his mission a few months ago, I thought it would be helpful to send some pre-written letters with him.  Ones that he could open and read, or re-read when he needed them.  So I wrote six letters for him to take.  I think.  I didn't actually make notes until after he left, so I am remembering as best I can.  If I didn't remember perfectly, then these are six letters that I wish I had written!  I wrote each one on a card, with a scripture or thought on the front of the card, and the body of the letter inside.  I am going to share the quotes and subjects, or ones that I think would be helpful, since I can't actually remember everything!  I wrote when he should open each letter on the outside of the envelope.  

1.  Open on First day-I wrote this on the front, "Lift up your heart and rejoice, for the hour of your mission is come; and your tongue shall be loosed, and you shall declare glad tidings of great joy unto this generation." (Doctrine and Covenants 31:3)  This was the scripture Sis. Pinegar read to us when I entered the MTC many years ago, and it struck me with such great force that I remembered it often both as a missionary, and since.  I wrote inside about how joyful we were that he was getting this amazing privilege to serve the Lord.  And how much joy he would receive from this great opportunity.

2.  Open when things are hard with your companion- Idea for the quote:  "“Do not waste time bothering whether you ‘love’ your neighbor; act as if you did. As soon as we do this we find one of the great secrets. When you are behaving as if you loved someone, you will presently come to love him.” C.S. Lewis
I shared my experiences of difficult companionships, and also my advice- to serve and pray for your companion.

3.  Open when things are good- I put this scripture on the front-"Yea, I know that I am nothing; as to my strength I am weak; therefore I will not boast of myself, but I will boast of my God, for in his strength I can do all things; yea, behold, many mighty miracles we have wrought in this land, for which we will praise his name forever."  Alma 26:12-This was the scripture I chose for my mission plaque.  I tried to always remember that I was just an instrument in the Lord's hands, working for his glory.  Inside, I wrote about humility and gratitude.

4.  Open when things are really hard-Idea for the front:  I think I put this scripture "And if men come unto me I will show unto them their weakness. I give unto men weakness that they may be humble; and my grace is sufficient for all men that humble themselves before me; for if they humble themselves before me, and have faith in me, then will I make weak things become strong unto them."  Ether 12:27.  I think I wrote about just hanging in there when things are tough, because you are never alone.  And how trials really do strengthen us in ways that we can't see or understand at the time.

5.  Open when you are doing everything right, but nothing is going right- I think I put this scripture on the front about the stripling warriors. "Yea, and they did obey and observe to perform every word of command with exactness; yea, and even according to their faith it was done unto them; and I did remember the words which they said unto me that their mothers had taught them." Alma 57:21.  I wrote about how sometimes, we have an "obedience month", as one of my companions called it.  When the Lord wants to see just how obedient you will be, even if the blessings aren't coming right away.  Actually, I think he wants US to know how obedient we can be.  Every missionary has an obedience month or two. 

6.  Open on your last day- I didn't send this letter with him, thinking that I would mail it as it gets closer.  I just hope I don't forget!  Scripture for the front: "Well done, thou good and faithful servant: thou hast been faithful over a few things, I will make thee ruler over many things: enter thou into the joy of thy lord."  Matt. 25:21
I would write about all the blessings we have received as a family, and that he has received as a missionary, and how great a privilege it is to serve the Lord with all your heart. 

I know that in this digital age, we need something tangible that we can hold and touch and read over and over.  I hope this gives you some ideas that you can use to help your missionaries!  I had the experience of serving a mission, but even if you are not an RM yourself, you have had many experiences in your life that you can draw on to give counsel and encouragement to your warriors!

P.S.  My son is brilliant.  I mean that literally.  But he JUST figured out that the cards OPEN and that there is something INSIDE!  *sigh*  So if your son/daughter is of the absent-minded variety, you might want to let them know that these are more than just quote cards!!!

Saturday, November 10, 2012

Greenie package

So I sent my first package to Uruguay. I have no clue when it will actually get there, but we wanted to send some love to our greenie. I went to the store and looked for anything green, reasonably small, and not too perishable. This is what we came up with:


Sour skittles.  Yum.
Elder Pyper LOVES jalapeno chips.  I wonder if they will be smithereens by the time they get there.
No one in our family can get enough of pez dispensers.  And who can resist ferb.  We love phineas and ferb.
A variety of green things-jello, mike and ikes, ring pops, gum
Green pumpkin flashlights!  And beef jerky.
Here is the whole caboodle.  I tried to send two of most things, one for Andy and his companion.
And to top it off, green packing tape!

I will update when I find out what condition this package arrived in .  Stay tuned for more ideas
!